Installing an LED light bar on your off-road vehicle, truck, or SUV seems straightforward. However, many users skip a critical component: the wiring harness. The result? Melted wires, blown fuses, or even vehicle fires. This guide explains why a proper wiring harness is essential, provides key technical specifications, and answers common questions like "Why do I need a relay?" and "How to choose the correct wire gauge?"
1.Why You Absolutely Need a Wiring Harness
Circuit Protection
Most vehicles' original lighting circuits are designed for low-amperage loads (typically 10-15 amps). An LED light bar can draw 20, 30, or even 40 amps. Connecting directly overloads the factory circuit, potentially melting wires or blowing fuses repeatedly. A dedicated wiring harness isolates the light bar, protecting your vehicle's electrical system.
Overheating Prevention
Without a harness, high current passes through thin factory wires, generating excessive heat. Over time, insulation melts, creating short circuits and fire hazards. A quality harness uses thicker wires that safely handle high currents without overheating.
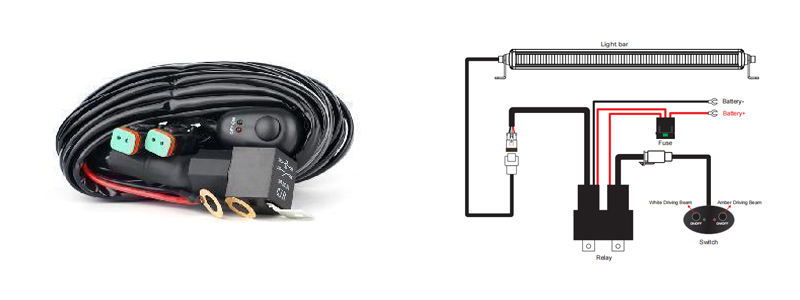
Relay & Fuse Integration
A proper harness includes a relay and an inline fuse. The relay allows a small trigger current from your existing switch to control a large current to the light bar. The fuse provides critical overcurrent protection, blowing before damage occurs.
2.Key Technical Specifications
When selecting a wiring harness, look for these specifications:
Voltage: (Operating voltage) 12V DC (cars/SUVs) or 24V DC (trucks/heavy equipment)
Max Power: (Maximum wattage supported) 300W to 1200W (depends on your light bar)
Wire Gauge: (Thickness of wires) See AWG table below
Relay: (Electromagnetic switch) 40A relay (standard for most light bars)
Fuse: (Overcurrent protection) Match your light bar's max current
Switch Type: (On/off control) Toggle switch, push button, or wireless remote
Waterproof Rating: (Weather resistance) IP65 (splash-proof) or IP67 (submersible)
AWG Wire Gauge Reference Table (Load Current at 25°C)
Note: AWG 20, 18, 16, 14, and 12 (marked with*) are common gauges for LED light bar wiring harnesses.
| AWG |
Cross-Sectional Area (mm²) |
Diameter (mm) |
Load Current (A) |
| 26 |
0.13 |
0.41 |
1 |
| 24 |
0.22 |
0.52 |
2 |
| 22 |
0.33 |
0.65 |
3 |
| 20* |
0.52 |
0.82 |
5 |
| 18* |
0.81 |
1.02 |
8 |
| 17 |
1.02 |
1.15 |
10 |
| 16* |
1.31 |
1.30 |
13 |
| 15 |
1.50 |
1.39 |
14 |
| 14* |
2.08 |
1.62 |
15 |
| 12* |
3.31 |
2.05 |
20 |
| 10 |
5.30 |
2.59 |
30 |
* Common wire gauges used for LED light bar wiring harnesses.
How to Use This Table:
Calculate your light bar's current draw using the formula: Amps = Watts ÷ Volts.
For example, for a 240W light bar on 12V: 240W ÷ 12V = 20 amps. According to the table, 12 AWG (20A capacity) is the minimum requirement. For a safety margin and to reduce voltage drop, 10 AWG is recommended.
Final Thoughts
A proper LED light bar wiring harness is not an accessory, it is a safety necessity. It protects your vehicle's electrical system, prevents overheating, and ensures reliable performance. When shopping for an off-road light wiring harness, pay attention to the wire gauge using the reference table above, as well as relay quality and waterproofing. If needed, refer to an LED light bar wiring diagram, and always calculate your current draw before selecting a wire gauge.


 2026-06-12